Landing at John F. Kennedy Airport? Read our 2026 JFK Survival Guide for insider hacks on Terminals 4 and 5, AirTrain costs, and finding your Uber pickup.
If you are flying into New York' s John F. Kennedy International Airport (JFK) for the first time, take a deep breath and prepare yourself. This is not the glamorous, futuristic "crossroads of the world" you see in movies. It is a massive, chaotic, and heavily under-reconstruction labyrinth that has brought even the most seasoned travelers to their knees.
As we navigate through 2026, JFK is undergoing a massive $19 billion redevelopment. With the new Terminal 6 under active construction and parts of the New Terminal One (NTO) opening, the airport is a perpetual construction zone. Temporary signs, ever-changing pedestrian detours, AirTrain fare traps, and nightmarish Uber pickups are leaving thousands of arriving passengers stranded and stressed every single day.
📌 Best Ways to Get from JFK to Manhattan (2026)
-
Cheapest: AirTrain to the Subway (A, E, J, Z lines). Total cost: $11.40. Takes 60-90 minutes.
-
Fastest/Best Value: AirTrain to the LIRR (Long Island Rail Road) at Jamaica Station. Total cost: ~$13.50 to $19.25 depending on peak hours. Takes 45 minutes to Penn Station or Grand Central.
-
Most Convenient: Uber, Lyft, or Yellow Cab. Cost: $75 - $100+ with tolls and tip. Takes 45-75 minutes depending on gridlock traffic.
-
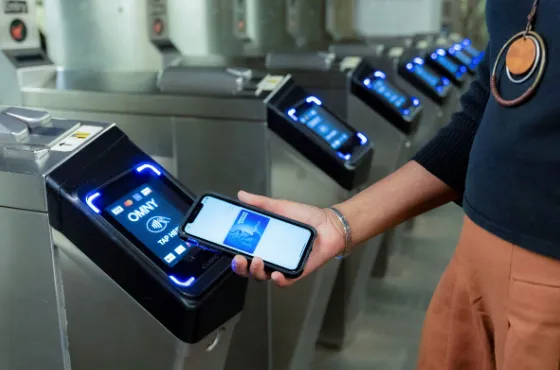
Pro Tip: You no longer need a MetroCard for the AirTrain; you can now tap-to-pay directly with OMNY (Apple Pay/Credit Card) at the exit gates!
Chapter 1: Why is JFK one of the most frustrating airports in the world to navigate?
Most travelers' nightmares begin because they expect JFK to be a cohesive, modern transit hub. It is not. It is a relic of 20th-century aviation infrastructure desperately trying to upgrade itself while serving 60 million passengers a year.
1. JFK is Not a Single Airport—It's a Disjointed "Archipelago"
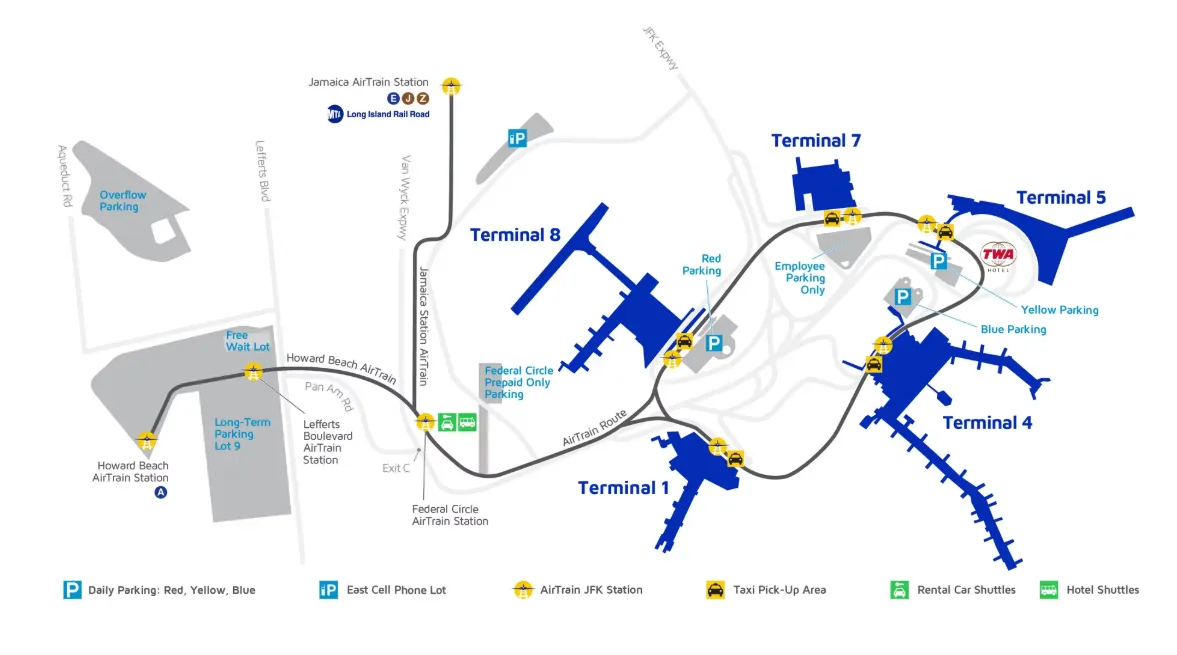
Unlike single-terminal giants like Singapore Changi, Tokyo Haneda, or London Heathrow Terminal 5, JFK is not a unified building. It is a collection of five active, completely isolated terminals (T1, T4, T5, T7, and T8) arranged in a massive, disjointed loop.
-
Corporate and Alliance Segregation: Each terminal is operated by different airline alliances or private management consortiums. They do not share facilities, baggage systems, or transit spaces.
-
No Walking Allowed: You physically cannot walk between terminals. They are separated by multi-lane active highways, restricted airport taxiways, and light rail tracks. If you end up in the wrong terminal, you cannot simply "walk next door." You must exit the building, haul your luggage onto a train, and clear security all over again.
-
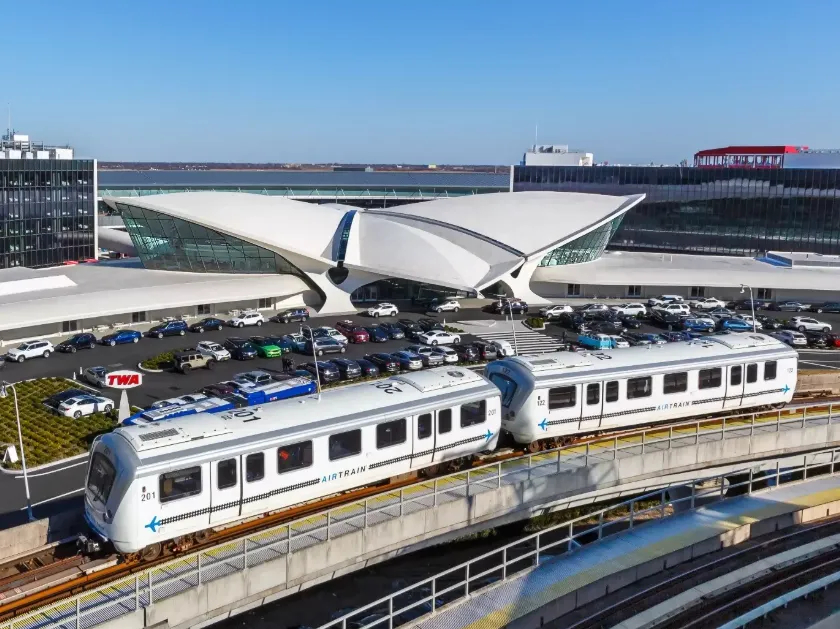
The AirTrain as the Crucial Lifeline: Because walking is physically impossible, your entire existence at JFK hinges on the AirTrain—the airport's automated light rail system. The AirTrain acts as the central nervous system connecting this disjointed archipelago. It is the only way to:
-
Transfer between all active passenger terminals.
-
Reach Federal Circle, the central hub for rental car facilities, hotel shuttles, and cargo operations.
-
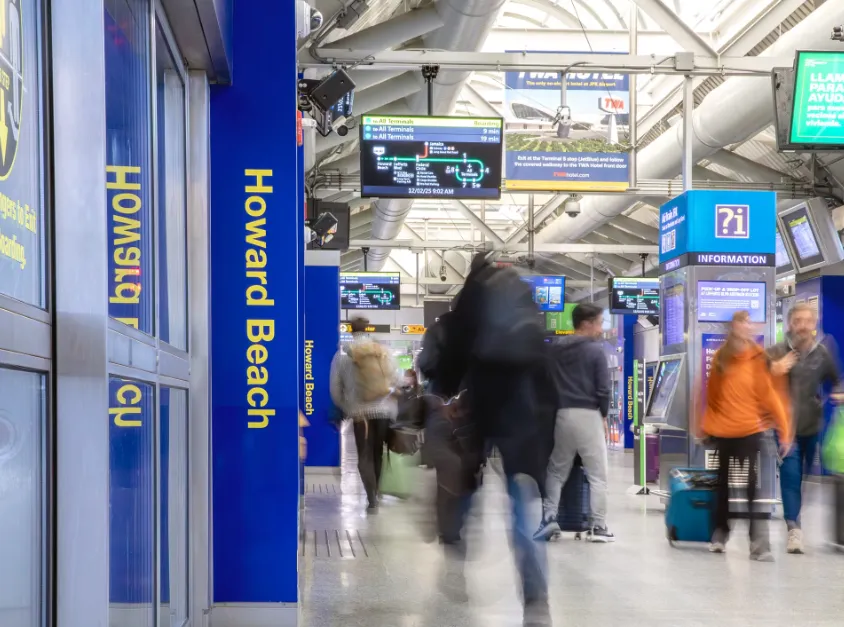
Connect to New York's massive public transit network at Jamaica Station (for the LIRR and Subways E, J, Z) and Howard Beach Station (for Subway A), which serves as your gateway to the city's bus and rail networks.
-
2. The Brutal "American Airport Logic"
If you are used to the "pampering" experience of world-class Asian or Middle Eastern hubs, JFK will shock you. In airports like Changi or Incheon, the design philosophy is protective and guiding—there are clear, multilingual signs every 10 meters, and staff members are ready to assist you.
At JFK, the default philosophy is: "You are an adult; you should already know how this works." Signage is minimal, heavily English-centric, and often obscured by construction scaffolding. Information booths are rarely staffed, and the general vibe is one of chaotic indifference. You are expected to read the dynamic boards, understand the airline alliances, and navigate the terminal splits entirely on your own.
3. The 2026 Construction Nightmare
JFK is currently undergoing a historic $19 billion face-lift, which makes traveling through it in 2026 uniquely painful.
-
The Active War Zone: The construction of the brand-new Terminal 6 (which will eventually connect to T5) and the sweeping expansion of the New Terminal One have turned the central terminal area into a dynamic maze of cranes, dust, and concrete barriers.
-
The Detour Trap: Pedestrian walkways change on a weekly basis. What was an exit path last week is now a boarded-up plywood wall. Orange temporary "DETOUR" signs are scattered everywhere, forcing passengers to push heavy luggage over temporary gravel pathways and through chain-link fences.
-
The Van Wyck Gridlock: Roadways surrounding the terminal arrivals and departures are choked with heavy machinery and lane closures. A simple car ride between T1 and T4 that should take 3 minutes can easily turn into a 30-minute crawl in bumper-to-bumper traffic.
If you don't know the rules of engagement before your wheels touch the tarmac, New York will give you a brutal welcome before you even clear customs. But don't worry—that is exactly why this survival guide exists.
Chapter 2: Landing in New York: Customs and Baggage Storage Hacks
Congratulations, you’ve survived the flight and safely landed at JFK. But before you can celebrate with a slice of classic New York pizza, you have to escape the airport. This is where most tourists make their first critical mistakes, losing valuable hours in soul-crushing customs lines or getting ripped off before they even exit the terminal doors.
Here are the hard-won "hacks" that will help you glide through customs and manage your luggage like a seasoned New Yorker.
1. The Ultimate Fast-Pass: Mobile Passport Control (MPC) App
On any given afternoon, as massive wide-body flights from Europe, Asia, and Latin America touch down simultaneously, JFK customs wait times at Terminal 4 and Terminal 1 can easily skyrocket to 2 to 3 hours. Standing in a stagnant, silent hall after a 12-hour flight is the ultimate test of human patience.
Thankfully, there is a legal, free, and criminally underused bypass: the Mobile Passport Control (MPC) app, officially run by U.S. Customs and Border Protection (CBP).
-
Who is eligible?
-
U.S. Citizens and Lawful Permanent Residents (Green Card holders).
-
Canadian Citizens.
-
ESTA (Visa Waiver Program) travelers who are returning to the U.S. on the same ESTA authorization.
-
B1/B2 Visa holders who have entered the United States at least once before using the same visa.
-
-
The Blueprint:
-
Download the "MPC" app before you fly.
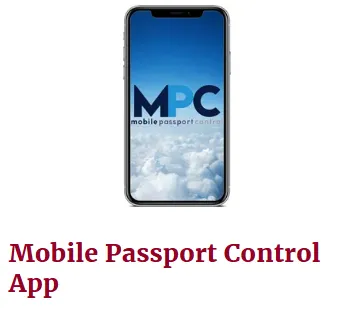 Image from cbp.gov, Copyright by original author
 -
As soon as your plane lands and you regain cell service, open the app, select JFK, take a quick selfie, and answer the standard customs questions.
-
Submit the form to receive an encrypted QR code on your screen.
-
When you enter the massive customs hall, do not join the regular, endless queue. Look for the physical signs pointing to the "MPC" lane (sometimes grouped near the diplomatic or crew lines).
-
Scan your QR code at the dedicated desk. You will often find only 2 or 3 people ahead of you, allowing you to breeze past hundreds of exhausted passengers in under 5 minutes.
-
2. The $8 Baggage Cart Trap and How to Bypass It
In almost every top-tier airport around the world, luggage carts are free. At JFK, welcome to raw, unadulterated American capitalism.
The moment you walk into the baggage claim area, you will be greeted by rows of heavy metal carts locked into SmartCarte dispensing machines. To unlock one, you must swipe your credit card and pay a staggering $6 to $8 per cart. If you are traveling with a family and need three carts, you’re looking at a $24 tax just to roll your bags 200 yards.
-
The Hack: If you only have a few suitcases, try to manage without them. But if you absolutely need a cart, do not pay the machines.
-
Instead, walk past the baggage claim and head toward the customs exit or the outer sliding doors. Arriving passengers who have just loaded their bags into Ubers, yellow cabs, or onto the AirTrain elevators routinely abandon their free-floating carts right on the sidewalk. You will almost always find a graveyard of perfectly functional, unlocked luggage carts sitting right outside the terminal exit. Grab one, roll back inside (or load your bags), and keep your $8 in your pocket.
3. Left Luggage: Where to Store Your Bags at JFK
Perhaps you have a 10-layover before your connecting flight and want to head into Manhattan, or maybe you checked out of your Airbnb early and want to explore Brooklyn bag-free.
First, the bad news: JFK has zero self-service luggage lockers. Due to strict TSA anti-terrorism regulations, you will not find a single locker anywhere in the airport.
However, there are secure, manned JFK baggage storage facilities (often referred to as "Left Luggage") where you can legally leave your suitcases for a daily fee.
-
Where to find them:
-
Terminal 4 (Arrivals Hall): Located on the Ground Floor near the East end exit, operated by Baggage Storage. It is open daily and highly secure.
-
Terminal 1 (Departures Hall): Located near the airline check-in counters (note: hours can be erratic due to T1's ongoing renovations).
-
Terminal 8 (Arrivals Hall): Conveniently located near the exit doors.
-
-
The Cost: Prices are calculated per bag, per 24-hour period, ranging from $15 to $40 depending on the physical size and weight of your suitcase.
-
The Catch: You must present a valid passport and your flight ticket to store bags. Keep your physical claim ticket in a safe place—if you lose it, retrieving your bags from the depths of JFK security is a multi-hour administrative nightmare.
Chapter 3: Terminal 4 vs. Terminal 5 — A Tale of Two Worlds
At JFK, your experience is entirely dictated by your gate. If your travel plans involve Terminal 4 or Terminal 5, you are about to experience two completely different dimensions of aviation culture. They are the most heavily trafficked terminals at the airport, and yet they operate under diametrically opposed philosophies.
Understanding the contrast between these two giants—and why transferring between them is a physical trial—is a crucial milestone in your JFK survival.
1. Terminal 4: The Beast of International Travel
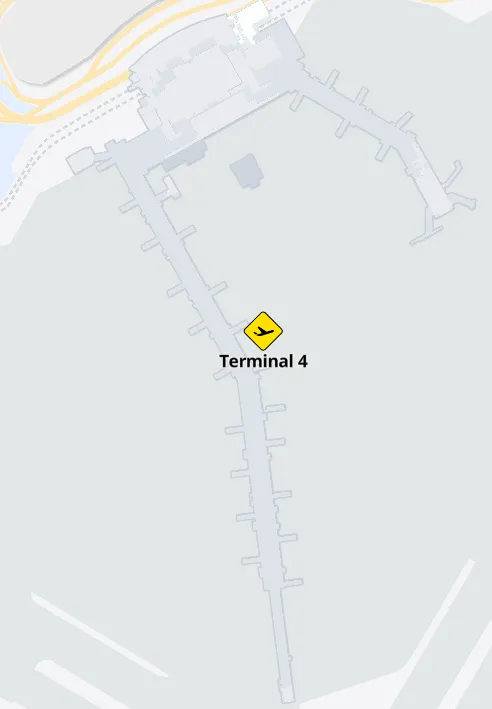
JFK Terminal 4 is the undisputed heavy hitter of the airport. As the primary hub for Delta Air Lines and dozens of major international carriers (including Emirates, Singapore Airlines, and Virgin Atlantic), T4 is a sprawling, multi-level metropolis that never sleeps.
-
The Scale and the Walk: T4 is physically immense. Its main concourses (Concourse A and Concourse B) are designed as linear piers. If your flight departs from or arrives at one of the higher-numbered gates in Concourse B (such as Gate B41 or B55), expect a grueling 15 to 20-minute power walk just to reach the main security or immigration area. There are moving walkways, but they are frequently broken or crowded with golf carts carrying priority passengers.
-
The Chaos: Because it handles a massive volume of international wide-body aircraft, T4 is perpetually crowded, noisy, and hot. During the evening peak departure wave (5:00 PM to 9:00 PM), the ticketing lobby turns into a sea of luggage and queue lines that spill out onto the sidewalk.
2. Terminal 5: The JetBlue Kingdom

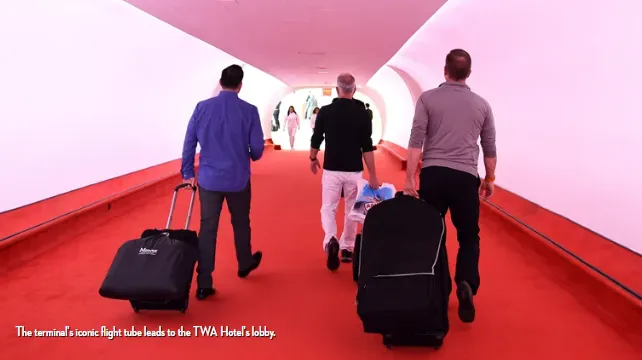
In stark contrast, JFK Terminal 5 is the sleek, compact home of JetBlue Airways. T5 was built around the historic, landmarked Trans World Flight Center (now the TWA Hotel) and was designed with a more modern, streamlined domestic travel experience in mind.
-
The Automation Focus: T5 is built on self-service. The ticketing lobby is packed with rows of touchscreen kiosks and automated self-service bag drops. If you are flying JetBlue with only carry-on baggage, you can bypass human interaction entirely and head straight to security in minutes.
-
The Vibe: T5 is generally quieter and cleaner than T4. It features a grand central retail marketplace with plenty of local New York dining options and even a unique outdoor rooftop dog park ("Wooftop") where passengers can relax before their flights.
-
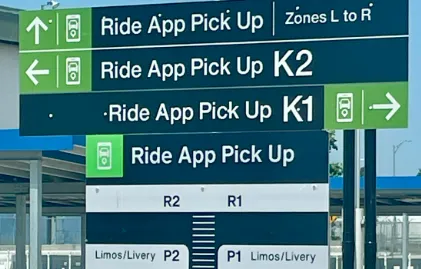
The Pick-up Catch: While T5 is pleasant inside, leaving it can be incredibly confusing. Unlike T4, which has a direct curbside drop-off and pickup setup, T5’s rideshare pickup zone (Uber/Lyft) is hidden deep inside the Yellow Parking Garage (more on this in Chapter 5).
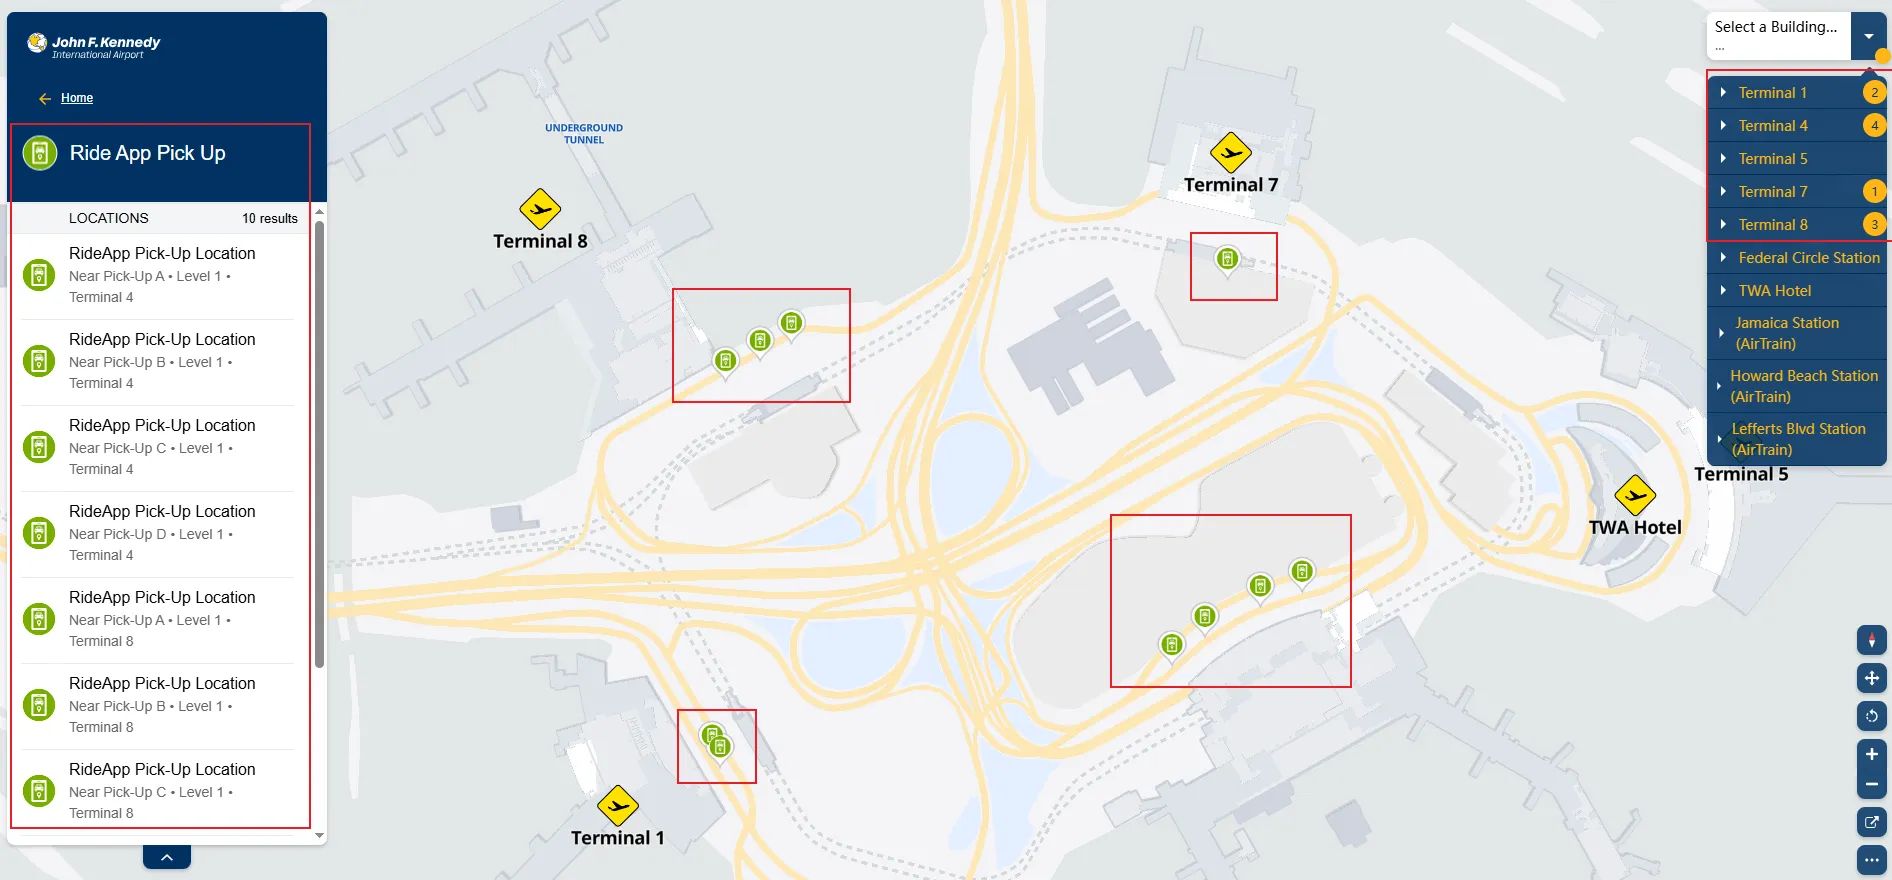
- ⚠️Note: Ride app pick-up locations for Terminal 5 and 7 have temporarily relocated to the Howard Beach AirTrain Station due to construction at JFK.
3. The T4 to T5 Transfer Trap
If you booked a self-transfer flight (booking separate tickets on different airlines, such as arriving on an international flight at T4 and departing on a domestic JetBlue flight at T5), you are walking straight into a logistical trap.
-
The Illusion of Proximity: On a map, T4 and T5 look like they are right next to each other. In reality, they are completely cut off. You physically cannot walk from T4 to T5. There are no pedestrian sidewalks, no sky bridges, and no underpasses linking the two.
-
The Transfer Ritual: To get from T4 to T5, you must:
-
Exit the secure area of T4 (which means claiming your luggage and walking out to the public arrivals hall).
-
Take the escalator or elevator up to the T4 AirTrain station.
-
Wait for the AirTrain and ride it one stop to Terminal 5.
-
Walk through the long pedestrian skywalk from the T5 AirTrain station into the main T5 departures lobby.
-
Clear TSA security all over again at Terminal 5. If you are doing this during peak travel hours, this entire process can easily consume 60 to 90 minutes of your life. If you have checked bags that aren't checked through, you must also wait to check them in at the T5 desk before heading to security.
-
Chapter 4: JFK AirTrain — The Ultimate Fare and Navigation Trap
Having read about the physical impossibility of walking between terminals, you might think: "No problem, I'll just hop on the AirTrain and glide seamlessly to my next destination."
Do not be fooled. The JFK AirTrain is one of the most brilliant yet highly controversial transit systems in the country. It is simultaneously your absolute lifeline and a massive financial and technical "trap" for unsuspecting travelers.
If you do not master its unique pricing logic and ticketing quirks before you tap your card, you will likely fall victim to double-charging, locked credit cards, or end up heading in the completely wrong direction.
JFK AirTrain: Free or Not?
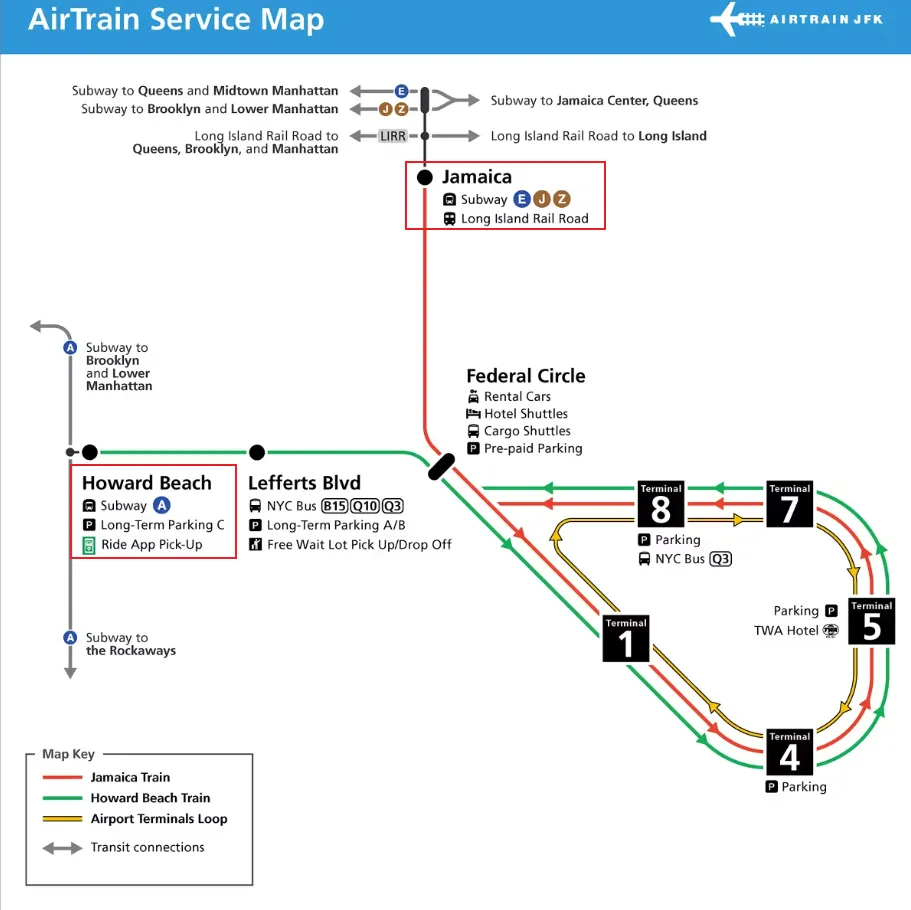
JFK AirTrain service map👇
1. The "In-Loop" vs. "Out-of-System" Pricing Formula
First, let's dispel the biggest myth: Is the AirTrain free? The answer is both yes and no.
-
The Free Zone (On-Airport Loop): Riding the AirTrain within the boundaries of the airport is 100% free. You can ride it back and forth between Terminal 1, 4, 5, 7, and 8, or head to Federal Circle (for rental cars and hotel shuttles). There are no gates, no tickets, and no payment readers required. You simply walk on and walk off.
-
The Paid Zone (Exiting the Airport): You only have to pay when you use the AirTrain to connect to New York's public transportation grid. Specifically, when you enter or exit the system at Jamaica Station or Howard Beach Station.
-
The 2026 Fare: As of 2026, the single-ride AirTrain fare stands at a steep $8.75. Keep in mind, this only gets you out of the AirTrain gates—your subway or commuter train fare into the city is entirely separate.
2. Jamaica vs. Howard Beach: Choose the Wrong Track, Pay the Price
Before boarding the AirTrain at your terminal, you must look at the digital overhead screens on the platform. The trains split into different routes. If you mindlessly board the first train that arrives, you might end up miles away from your intended connection.
| AirTrain Exit Station | Transit Connections | Best For | Essential Tips |
|---|---|---|---|
| Jamaica Station | Subway E / J / Z lines • LIRR (Long Island Rail Road) • Multiple bus routes | Midtown Manhattan • Queens • Long Island | The most popular and best-connected AirTrain exit. If you're heading to Midtown Manhattan, consider taking the LIRR after exiting AirTrain — it reaches Grand Central or Penn Station in about 20 minutes and is far more comfortable than a crowded subway ride. |
| Howard Beach Station | Subway A line | Lower Manhattan • Brooklyn | Service is less frequent than Jamaica Station. The A train is one of NYC’s longest subway lines and splits into multiple branches farther south. Before boarding, always check the platform display to make sure the train is heading toward Manhattan, not toward Rockaway Beach. |
-
Jamaica Station Route (Red Line): This is the most popular route. It connects you to Subways E, J, Z and the Long Island Rail Road (LIRR). Choose this if you are heading to Midtown Manhattan, Queens, Brooklyn, or Long Island.
-
Howard Beach Station Route (Green Line): This connects you to the Subway A train. Choose this if you are heading to Lower Manhattan, parts of Brooklyn, or JFK-adjacent areas.
-
The Detour Penalty: If you accidentally take the Howard Beach train when you wanted Jamaica, you cannot easily switch back without exiting. If you pass the turnstiles to fix your mistake, you will be docked $8.75 instantly just to turn around.
3. 【The Pro Hack】The Most Dignified Escape: Long Island Rail Road (LIRR) from Jamaica
Most generic travel guides will tell you: "Take the AirTrain to Jamaica, then take the Subway E train to Manhattan. It's cheap!" As a veteran travel editor, I am telling you that this is an exhausting, soul-crushing rookie move. The E train is a local subway. It is loud, old, has no luggage racks, stops at dozens of local stations, and is often intensely crowded. Dragging two heavy suitcases onto a packed E train at rush hour is a miserable introduction to New York.
Instead, use the ultimate "Dignified Escape": The Long Island Rail Road (LIRR).
-
The Speed Advantage: The Subway E train from Jamaica to Midtown takes at least 45 to 55 minutes. The LIRR train from Jamaica Station takes just 20 minutes flat to reach Grand Central Terminal or Penn Station in Manhattan.
-
The Comfort Upgrade: LIRR trains are double-decker commuter trains. They are clean, bright, air-conditioned, feature overhead luggage racks, and are heavily patrolled by conductors. It is a vastly safer and more comfortable experience.
-
The Price Sweetener: While a peak LIRR ticket costs more, if you travel during off-peak hours or on weekends, you can purchase a "CityTicket" on the MTA TrainTime app or at the station kiosks. The CityTicket is only $5.00!
-
For a total of $13.75 ($8.75 AirTrain + $5.00 LIRR), you can escape the airport chaos and arrive at the gorgeous Grand Central Terminal in 20 minutes like a high-earning local.
4. The OMNY Contactless Turnstile Trap: The Multi-Tap Lock
JFK has fully phased out the old physical MetroCard machines at the AirTrain gates, replacing them entirely with OMNY contactless readers. You can now simply tap your phone (Apple Pay, Google Pay) or a contactless credit card at the turnstiles to exit.
However, this modern upgrade has introduced a massive technical trap: The "Multi-Tap Lockout."
-
The Scene: You are traveling with your partner or family. You step up to the turnstile, tap your phone, let your partner pass, and then immediately tap your phone again to let yourself through.
-
The Lockout: The turnstile will flash "LOCKED" or "TRY AGAIN" and refuse to open. OMNY's security algorithm is programmed to prevent card theft and rapid duplicate charges. If the system detects multiple taps from the exact same physical device or credit card within a short time window, it will instantly freeze further charges.
-
The Result: You are now stuck at the gates, with a long line of angry, rushing commuters behind you, waiting for an MTA employee to manually reset your card—a process that can take 15 minutes.
-
The Survival Rule: One device/card per person. Every traveler in your party must use their own unique payment method (e.g., you use your Apple Pay, your partner uses a physical contactless Visa card, and your child uses a contactless Mastercard). Do not attempt to share a single payment source at the AirTrain turnstiles.
-
Proximity Warning: Keep your wallet closed. The OMNY readers are incredibly sensitive. If you hold your wallet near the reader, it may scan a card inside your pocket and charge you, while you manually tap your phone, resulting in a double charge.
NYC Subway: A Complete Beginner’s Guide (OMNY, Lines, Stations & Signs)
Chapter 5: JFK Uber / Lyft Pickups Are a Real-Life Escape Room
To bypass the complex turnstiles and multi-modal transit transfers at Jamaica Station, you might look at your heavy luggage and decide to splurge: "I'll just order an Uber or Lyft straight to my hotel. It's New York, how hard can it be to get a car?"
Welcome to your next major JFK reality check. In 2026, ordering a rideshare at JFK is not a seamless luxury—it is a chaotic, frustrating, and heavily physically taxing "escape room."
If you step outside the sliding doors expecting a sleek sedan to pull up gracefully at the arrivals curb, you will be met with active construction barriers, screaming airport police with bullhorns, and a driver who is trapped in a gridlock half a mile away.
1. Banished to the Garages: The Ever-Shifting Pickup Zones
Due to the multi-billion-dollar redevelopment program, passengers are forced to drag their bags to designated FHV (For Hire Vehicle) Pickup Zones. Because of active construction and road closures in 2026, these locations change. We highly recommend checking the official JFK Airport Website (jfkairport.com) or JFK official airport app in real-time right after you land to verify the most up-to-date pickup locations.
As of mid-2026, the primary pickup configurations are:
-
Terminal 4 (International Hub): The rideshare zone is banished to the T4 Parking Garage Ground Level. This requires exiting the terminal, taking the escalators up to the skywalk, walking several hundred yards over active construction routes, taking an elevator down into the dark, exhaust-fume-choked concrete depths of the garage, and locating a numbered pillar (e.g., Pillar A3).
-
Terminal 5 (JetBlue): You must follow the signs to the Yellow Parking Garage, traversing a long network of skywalks and elevator banks to reach the designated indoor rideshare lanes.
-
The Construction Detour: Expect to negotiate narrow plywood corridors, gravel detours, and temporary plastic orange barriers. If you have multiple heavy bags or are traveling with elderly relatives or children, this trek can feel like a grueling hike.
2. Signal Dead Zones: App Paralyzed
In concrete parking garages packed with thousands of arriving passengers opening Uber/Lyft simultaneously, local cellular networks and the airport Wi-Fi enter "soft paralysis." Your app may lag endlessly, leaving you unable to see your driver's real-time location or send messages while they circle desperately nearby.
3. The 5-Minute Cancellation Trap
Due to gridlock, it can take drivers 20–30 minutes to crawl into the pickup lanes. Consequently, they are on a short fuse. If they reach your designated garage pillar and you aren't ready to load your bags within 5 minutes, they will cancel, leaving you to restart the process and hitting you with a $5 to $10 fee.
4. Surge Pricing: The Peak Squeeze
During bad weather, holidays, or peak hours, dynamic pricing (Surge) can easily inflate a standard $65 ride to $120–$180. This is before adding mandatory tolls, the Port Authority's airport pickup surcharge, and the customary 18–20% NYC gratuity.
5. Why the Yellow Cab (Official NYC Taxi) is Often the Superior Move
If the idea of hauling your bags through a maze of parking garages and fighting Wi-Fi dead zones sounds exhausting, it's because it is. This is why seasoned New York travelers often completely ignore Uber and Lyft and head straight for the iconic NYC Yellow Cab.
-
The Flat Rate Advantage: Taxis departing JFK to any destination in Manhattan operate under a strictly regulated Flat Rate (currently $70.00 to $75.00 depending on the peak hour surcharges, plus tolls and tips). If you are stuck in gridlock on the Grand Central Parkway for two hours, the price does not change. During surge periods, the Yellow Cab is almost always significantly cheaper than rideshares.
-
The Ultimate Convenience: Yellow Cabs have priority access. You do not have to hike to a distant, dusty parking garage. They are lined up directly outside the terminal sliding doors.
The Official Yellow Cab Stand Locations (Where to Board Safely)
| Terminal | Taxi Pickup Location | Area | Notes |
|---|---|---|---|
| T1 | Level 1 Arrivals, near the curbside | Near post-security arrivals exit | Large volume of international passengers. After customs, simply follow the “Taxi” signs. |
| T4 | Level 1 Arrivals, near the Arrival Lounge | Outside security | One of the busiest taxi pickup queues at JFK, especially during international arrival peaks. |
| T5 | Level 1 Arrivals, near Yellow Parking | Outside security | JetBlue’s main terminal. Easy to confuse the taxi queue with ride app pickup areas. |
| T7 | Level 1 Arrivals, near the curbside | Outside security | Smaller terminal with a relatively straightforward layout. |
| T8 | Level 1 Arrivals / Connecting Tunnel area, near the curbside | Outside security | American Airlines’ main hub at JFK, with heavy transfer passenger traffic. |
Important: JFK is currently undergoing major construction and operational changes. Always confirm the latest pickup locations through the official JFK Airport website or app before arrival.
Navigating the JFK Rideshare Pickup Zones:
Uber and Lyft are not allowed to pick you up right at the arrivals curb. Once you grab your bags, follow the green signs for "Ride App Pick Up" or "Car Services." You will usually have to walk across the inner roadway to a designated parking lot or garage level (this varies by terminal). Do not request your Uber until you are physically standing in the designated Ride App zone, as drivers cannot wait long and cancellation fees apply.
Chapter 6: JFK Connection Times — The Brutal International-to-Domestic Transit Gauntlet
Having mastered the transit loops and the rideshare pickup games, you might be a traveler with a connecting flight thinking: "Phew, thank goodness I bought a connecting itinerary. I’m just changing planes at JFK to fly to Orlando or San Francisco. None of these city transit and baggage storage nightmares apply to me."
Many first-time travelers purchase tickets with a "2-hour connection" at JFK and assume that because the airline sold it, it's plenty of time. However, seasoned road warriors will tell you that a 2-hour international transfer at JFK is practically a guaranteed way to miss your flight and secure an unexpected overnight stay in New York.
This is because the United States operates under a highly unique, non-negotiable immigration and customs transit model that catches millions of global passengers off guard every year.
1. Step-by-Step: The Six Stages of the International Transit Gauntlet
Unlike airports in Europe, Asia, or the Middle East, the United States has no concept of "sterile international transit." There is no way to bypass passport control even if you are just passing through. Every single passenger arriving on an international flight must legally enter the U.S. at their first point of entry (JFK) and complete a grueling six-stage gauntlet:
Stage 1: Clear US Immigration (CBP Passport Control) —— 45 to 120 Minutes
-
The Reality: The moment you exit the aircraft, you must join the massive immigration queue. At international hubs like T1 and T4, during peak afternoon hours, the halls are packed with hundreds of travelers.
-
The Strategy: If you are eligible for the MPC (Mobile Passport Control) app (U.S./Canadian Citizens, Green Card holders, or returning ESTA/B1/B2 travelers), open it and submit your QR code immediately. If not, do not walk—run directly to the queue the second you step off the jet bridge.
Stage 2: Retrieve ALL Checked Baggage (No Exceptions!) —— 20 to 45 Minutes
-
The Reality: Even if your baggage has a tag showing your final domestic destination, you must physically pull your suitcases off the carousel at JFK.
-
The Trap: JFK’s baggage handling is notoriously slow. Waiting for luggage from a fully loaded Airbus A380 can easily consume 40 minutes while you watch your connecting flight window shrink.
Stage 3: Pass Through Customs & Agricultural Inspection —— 10 to 20 Minutes
-
The Reality: You must push your baggage through the agricultural customs checkpoint.
-
The Warning: Bringing undeclared fresh fruits, plants, meats, seeds, or certain food items from abroad into the U.S. will trigger immediate, severe penalties (fines starting at $300) and can result in the immediate cancellation of your visa or ESTA.
Stage 4: Re-Check Your Luggage (The Critical Split) —— 15 to 30 Minutes
-
For Single-Ticket Connections: Once you exit the customs doors, look immediately for the "Baggage Drop-off" or "Connecting Flights" counter. If your bags are already tagged to your final destination, you simply drop them onto the belt here.
-
For Separate-Ticket Transfers: If you booked your flights on two separate tickets, the transfer desk will reject your bags. You must drag your heavy suitcases out of the terminal, proceed to your departing airline's terminal departures lobby, and queue at their regular check-in counter. This adds at least 45 minutes to the process.
Stage 5: Inter-Terminal Commute (The 2026 Construction Twist) —— 30 to 50 Minutes
-
The Reality: If your domestic carrier departs from a different terminal (e.g., landing on Air China at T1 and connecting to Delta at T4), you must head to the AirTrain.
-
The 2026 Twist: Because of active Terminal 6 construction, certain AirTrain tracks are occasionally closed for maintenance. This forces passengers onto temporary shuttle buses (Shuttle Buses) which are subject to severe terminal roadway gridlock.
Stage 6: Clear TSA Security at Your New Terminal —— 30 to 60 Minutes
-
The Reality: You must clear TSA security all over again at your departing terminal. * The Process: This means standing in another long queue, removing your shoes, taking out laptops, separating liquids, and undergoing a full screening.
2. 2026 JFK Connection Time Recommendation Chart
To ensure you make your next flight and protect your peace of mind, we have compiled the ultimate 2026 JFK connection guide based on active construction timelines and average wait times:
|
Connection Type |
Recommended Minimum Layover |
Risk Level |
Survival Strategy |
|---|---|---|---|
|
Domestic to Domestic
(Same Terminal) |
1.5 to 2 Hours |
🟢 Low |
Highly manageable. Just watch out for potential delays on your incoming regional flight. |
|
Domestic to Domestic
(Different Terminals) |
2.5 Hours + |
🟡 Medium |
You must ride the AirTrain between terminals and clear TSA security again at your departing terminal. |
|
International to Domestic
(Single Ticket/Union) |
3.5 to 5 Hours |
🔴 High |
Never book less than 3 hours. Immigration lines, baggage collection, re-checking, terminal transit, and TSA screening will easily consume 3 hours during peak times. |
|
Separate Tickets (Non-Connected)
(Any Terminal) |
5 Hours + |
💀 Extreme |
If your incoming flight is delayed and you miss your connection, the second airline is not obligated to help or rebook you. You have zero safety net. |
Chapter 7: The 10 Most Common Mistakes First-Time Travelers Make at JFK
No matter how smart or well-traveled you are, JFK has a unique way of exposing gaps in your planning. Millions of passengers exit this airport everyday with drained wallets, missed connections, or elevated blood pressure simply because they fell into the same predictable traps.
If you want to bypass the typical rookie disasters and navigate like a native New Yorker, make sure you memorize these 10 critical mistakes before you travel.
1. Assuming you can "walk next door" between terminals
-
The Blunder: Seeing "Terminal 4" and "Terminal 5" on a map and assuming it's a brisk 5-minute walk.
-
The Reality: JFK's terminals are physically isolated by high-speed highway loops, airport taxiways, and security fences. There are no pedestrian walkways connecting them.
-
The Fix: Treat each terminal like a completely separate airport. Your only option is to use the AirTrain.
2. Believing the AirTrain is entirely free
-
The Blunder: Jumping on the AirTrain to Jamaica or Howard Beach, thinking it is a free public airport service.
-
The Reality: While riding inside the terminal loop is free, you must pay $8.75 at the exit turnstiles when leaving at Jamaica or Howard Beach to catch the subway or train.
-
The Fix: Ensure your mobile wallet has a functional contactless card, or hold some spare funds in your account to avoid getting stranded at the exit turnstiles.
3. Standing at the arrivals curb waiting for your Uber or Lyft
-
The Blunder: Exiting the sliding baggage doors, requesting a rideshare, and waiting at the terminal curb expecting the car to pull up.
-
The Reality: App-based rideshares are legally banned from the terminal arrivals curbside.
-
The Fix: You must hike to the designated FHV Pickup Zones located inside the concrete parking garages (e.g., T4 Parking Garage Ground Level or the T5 Yellow Garage).
4. Booking an international transfer with a 2-hour layover
-
The Blunder: Trusting travel search engines that sell "cheap flights" with a 2-hour international connection at JFK.
-
The Reality: As detailed in Chapter 6, you must clear immigration, claim all your luggage, pass customs, drop your bags back off, change terminals via AirTrain, and clear TSA security all over again. Under normal conditions, this takes 3 hours.
-
The Fix: Never book an international-to-domestic flight connection at JFK with a layover of less than 3.5 hours.
5. Shelling out $8 for a baggage cart at the carousel
-
The Blunder: Blindly sliding your credit card into the SmartCarte machines inside the arrivals hall because you have three heavy suitcases.
-
The Reality: Carts inside the terminal are locked and cost $6 to $8.
-
The Fix: Walk just 50 yards further. Exiting passengers routinely leave perfectly functional, unlocked carts right outside on the sidewalks near the taxi stands or AirTrain elevators. Grab one for free.
6. Trusting "helpful" solicitors inside the arrivals hall
-
The Blunder: Accepting a ride from friendly people holding iPad signs or approaching you asking: "Hey, need a taxi/Uber? Right this way."
-
The Reality: These are unlicensed gypsy cabs (black market drivers). They will lure you into their private vehicles and charge you double or triple the official rates, sometimes demanding $200–$300 for a ride to Manhattan under threat of holding your luggage.
-
The Fix: Completely ignore them. Walk directly past them to the official Yellow Cab stand or order through your official Uber/Lyft app.
7. Relying completely on airport Wi-Fi and live apps
-
The Blunder: Expecting to land, connect to "JFK Free Wi-Fi," and look up your hotel directions, subway maps, or rideshare app live.
-
The Reality: The airport’s public Wi-Fi is notoriously spotty, slow, and frequently crashes inside the high-density concrete parking garages or basement customs halls.
-
The Fix: Before departing your origin airport, download an offline Google Map of the JFK/New York area, and take screenshots of your flight tickets, hotel reservations, and travel guides.
8. Ignoring the physical orange temporary "DETOUR" signs
-
The Blunder: Relying on directions from old travel blogs, YouTube videos, or even official terminal signs that look permanent.
-
The Reality: Because of the $19 billion active reconstruction program in 2026, dynamic pathways change on a weekly basis. A permanent sign might point to a corridor that is currently walled off with plywood.
-
The Fix: Pay active attention to the temporary orange "DETOUR" and construction signs posted on the walls. They are the only accurate real-time guides.
9. Buying overpriced tourist SIM cards at terminal retail kiosks
-
The Blunder: Panic-buying a temporary tourist cellular SIM card at the arrivals hall retail stores to get instant network access.
-
The Reality: Airport kiosks markup tourist SIM cards by up to 100%, offering poor data limits for extortionate rates.
-
The Fix: Purchase and activate a digital eSIM (using services like Airalo, Nomad, or Holafly) before you even board your flight. You'll gain instant, cheap 5G cellular access the second your plane touches down.
10. Traveling without a physical black pen in your carry-on bag
-
The Blunder: Assuming everything in 2026 is digital, and boarding your flight with nothing but a smartphone.
-
The Reality: While much has been digitized, paper declaration forms, agricultural slips, or random customs questionnaires still pop up. If you don't have a pen, you will lose valuable places in the customs queue trying to borrow one from fellow passengers.
-
The Fix: Keep a cheap, functional black ink pen in your passport cover or personal bag at all times.
Chapter 8: The Ultimate JFK Survival Checklist (Save to Phone)
When you are jet-lagged, carrying heavy bags, and trying to navigate active construction sites under the watchful eyes of yelling airport police, your brain's processing capacity is cut in half. To ensure you don't miss a step or fall into any money-draining pitfalls, we have compiled the ultimate JFK Airport Survival Checklist.
Take a screenshot of this page, keep it in your favorites, and check off each step as you complete your mission.
🧳 Phase 1: Pre-Departure Preparation (Before You Fly)
-
[ ] Offline Maps Downloaded: Google Maps offline layout of JFK Airport and Greater New York City saved on your phone.
-
[ ] Immigration Fast-Pass Prepared: Downloaded the official MPC (Mobile Passport Control) app and completed passenger profiles.
-
[ ] Digital Backup Screenshotted: Offline screenshots of flight tickets, seat numbers, hotel confirmations, and Airbnb addresses saved in a dedicated photo album.
-
[ ] Physical Black Pen Packed: Placed a reliable black ink pen inside your passport case or easy-access personal pocket.
-
[ ] OMNY Devices Configured: Ensured each member of your traveling party has a unique, contactless card or separate digital wallet (Apple Pay/Google Pay) loaded with distinct credit/debit cards to avoid turnstile locks.
-
[ ] eSIM Cellular Data Purchased: Activated an international eSIM data package before departure to bypass inflated airport retail SIM kiosks.
🛂 Phase 2: The Customs & Baggage Re-Check Gauntlet (Upon Landing)
-
[ ] The Swift Walk: Move quickly from the gate to the CBP Immigration Hall to get ahead of the crowds.
-
[ ] MPC QR Code Generated: Opened the MPC App upon landing, submitted your profile on cellular data, and generated your entry QR code.
-
[ ] MPC Lane Located: Walked past the main line and located the designated MPC Express lane for Under-5-Minute clearance.
-
[ ] Checked Luggage Recovered: Stood by your terminal's carousel and pulled all checked bags off (mandatory for all international passengers).
-
[ ] Baggage Cart Secured for Free: Ignored the paid SmartCarte machines and grabbed an abandoned cart near the outer sidewalk exits or AirTrain lifts.
-
[ ] Agricultural Declaration Verified: Confirmed your bags contain no fresh agricultural prohibited items (meats, fresh fruits, seeds, organic plants).
-
[ ] Baggage Re-Deposited:
-
Single Ticket: Handed bags back at the "Connecting Flights / Baggage Drop-off" counter outside customs.
-
Separate Tickets: Hauled bags to the departing airline's check-in desk at the departure terminal.
-
🚊 Phase 3: The AirTrain Terminal Shuttle (Inter-Terminal or City Exit)
-
[ ] Inner-Loop Free Travel: Utilized the AirTrain for free inter-terminal transfers without tapping or paying.
-
[ ] Destination Route Confirmed: Checked the overhead digital platforms for the Jamaica Station Route (Red) or Howard Beach Route (Green).
-
[ ] Unique Device Payment: Tapped distinct OMNY devices per passenger at the exit gates to prevent anti-fraud turnstile locks.
-
[ ] Dignified Transit Swapped: Avoided the slow Subway E line at Jamaica; purchased a $5.00 CityTicket on the MTA TrainTime app to ride the spacious, double-decker LIRR straight to Midtown Manhattan in 20 minutes.
🚗 Phase 4: Taxi & Rideshare Pickups (Exiting the Airport)
-
[ ] Real-Time Pickup Points Verified: Checked the official JFK website (jfkairport.com) or Port Authority App for the latest 2026 construction pickup changes.
-
[ ] Rideshare Zone Hiked: Walked past terminal curb exits and navigated construction skywalks to reach the dedicated FHV Pickup Zones (T4 Garage Ground Level, T5 Yellow Garage).
-
[ ] The 5-Minute Timer Watch: Stayed fully prepared at your designated garage pillar before requesting an Uber/Lyft to avoid late-arrival cancellation fees.
-
[ ] The Surge Price Checked: Compared rideshare prices with the official Yellow Cab flat-rate pricing ($70–$75 + tolls & tips) to avoid dynamic pricing.
-
[ ] Gypsy Cabs Ignored: Walked past independent drivers soliciting rides in the arrivals lobby; talked only to the uniformed dispatcher at the official terminal Taxi Stands.
Conclusion
JFK will not welcome you with open arms. It is loud, under-construction, and entirely indifferent to whether you make your flight or find your ride. But remember: New York itself operates on the same tough-love frequency.
If you master the AirTrain loop logic, calculate a failsafe buffer for international connections, and confidently walk past the gypsy cab recruiters straight to the yellow cab line or the rideshare garage, JFK's perpetual chaos won't touch you.
Survival in New York belongs to those who prepare. Pack your black pen, double-check your terminal gate numbers, and welcome to the Big Apple!
Related guide: New York to Philadelphia Transportation Guide